Figuring out how to brew keptinis
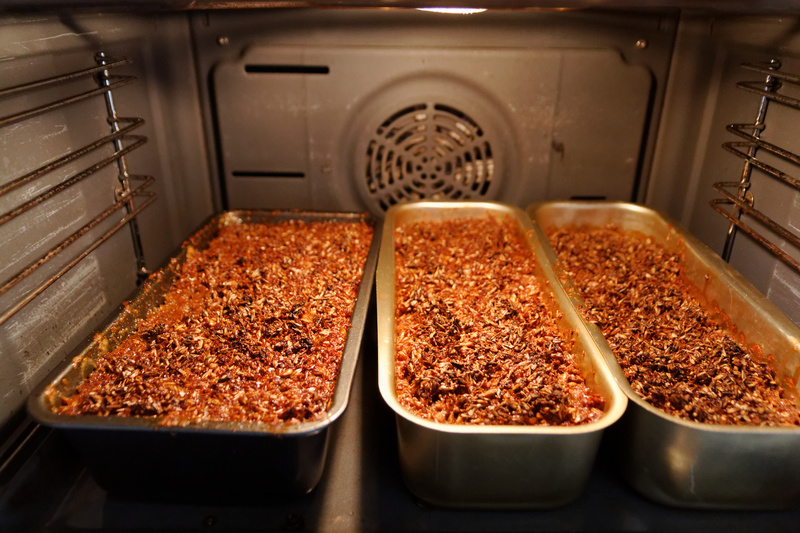
Mash baking in my kitchen oven |
I visited Vikonys in Lithuania and saw how the Lithuanians there brew keptinis. The basic idea is straightforward enough: do a normal mash, then bake the mash in a huge Lithuanian duonkepis oven to get caramel flavours by toasting the sugars in the mash. This is an important idea, because it's a completely "new" type of brewing process that creates flavours you cannot make with normal techniques.
My problem was that although I'd seen it done, I didn't know what temperature to bake the mash at, because I didn't dare stick my thermometer into that very hot oven. It was no use asking the brewers, because they determine the temperature by the amount of wood they burn in the oven. So how to put together a recipe that other people could use? I decided the only way to do it was to brew keptinis myself at home at different temperatures to find out what worked and didn't work.
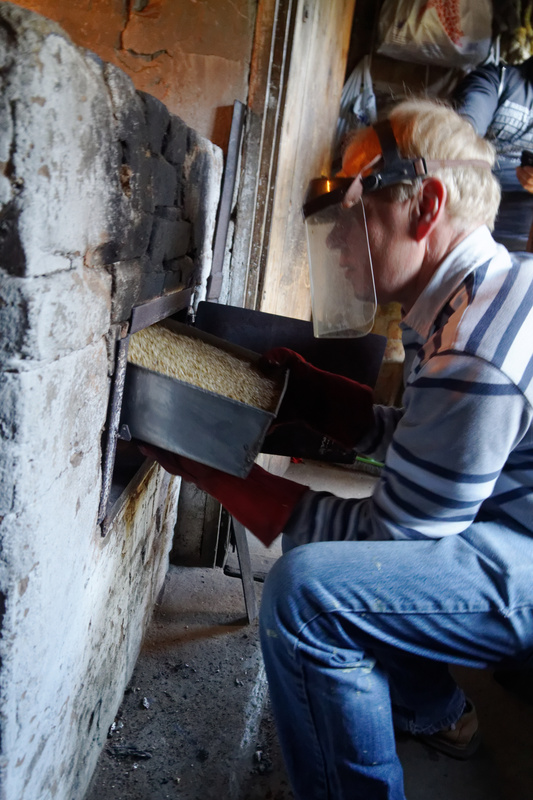
Vytautas Jančys putting the mash into an oven so hot he's wearing huge gloves and a plexiglass visor. |
My goal was to recreate that huge, massive earthy and caramelly flavour I remembered from the keptinis I'd tasted in Vikonys.
I guess I must be the only non-Lithuanian whose first solo brew was a keptinis.
Plan
I did a little reading on caramelization and found that it's actually chemically very complex, to the point that it's not yet fully understood. By looking at the most common sugar types in wort and their caramelization temperatures I found I could get a tiny amount of caramelization at 110C, but for most of it I'd have to get to 160-180C.
I also learned that at too high temperatures all that lovely caramel is burnt into sooty black stuff, so I wanted to avoid that.
Simonas's estimate of the temperature of the duonkepis oven at 300C seemed reasonable to me, but since the temperature clearly fell during the baking it seemed reasonable to keep my electric oven a little lower. I decided to try 250C.
First attempt
The starting point was figuring out the batch size, because the limiting factor was our kitchen oven. Or, to be precise, our oven pans. So I took out my wife's various oven pans and computed the total volume. 9 liters. Okay, so that would be my total mash volume. I thought malts and water would fill equal amounts, meaning I could have 4.5 liters of malts and 4.5 liters of water. So I weighed 4.5 liters of malts and found that was 2.2 kilos. From that I could work out that to follow the Lithuanian recipe my batch size would be 5.6 liters with 33 grams of hops.
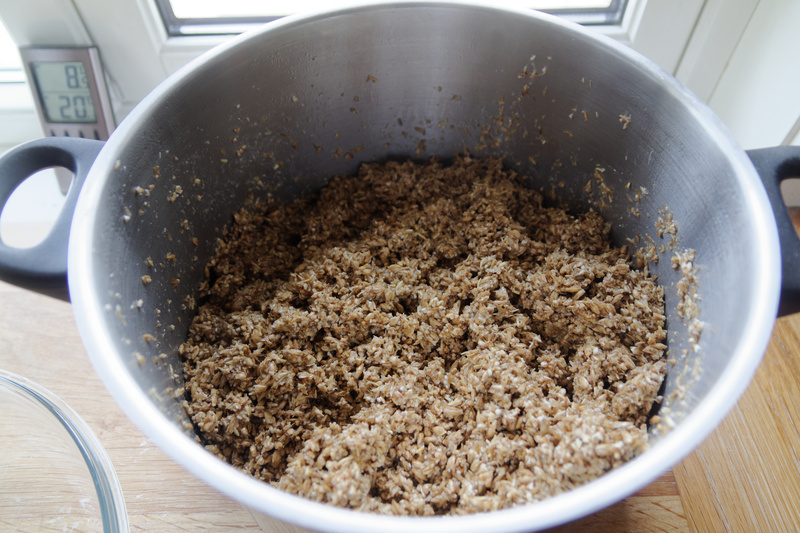
The mash. |
I heated water, put the malts in a kettle and added water until I had the mash at 65C. Quite soon I realized having this in a kettle was dumb, because the temperature kept dropping. So I had to add more hot water periodically.
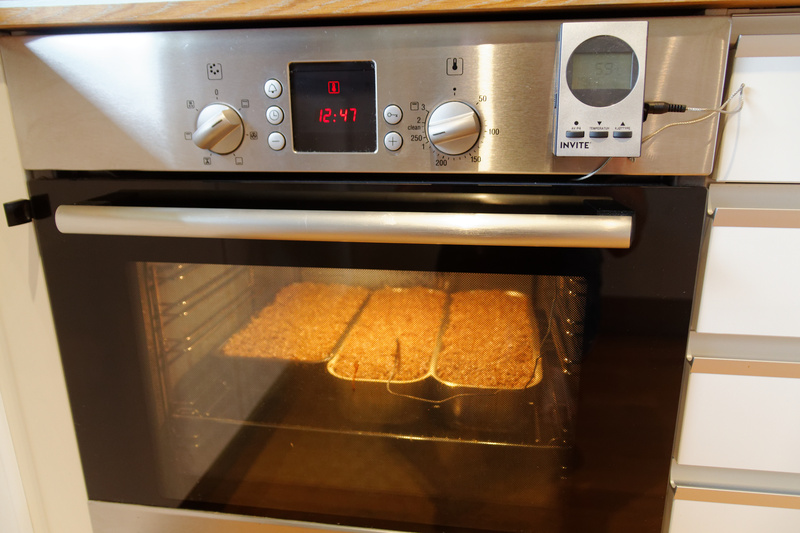
While the mashing was going on I heated the kitchen oven to 250C, and once I had mashed for an hour I scooped the mash over into the oven pans. And now I found to my surprise that 4.5 liters of malts plus the 3.2 liters of water I had added in total filled ... 4.5 liters. So I could have doubled the batch size and still had room for everything. Ah well. A small batch size for the first try was probably a good idea anyway.
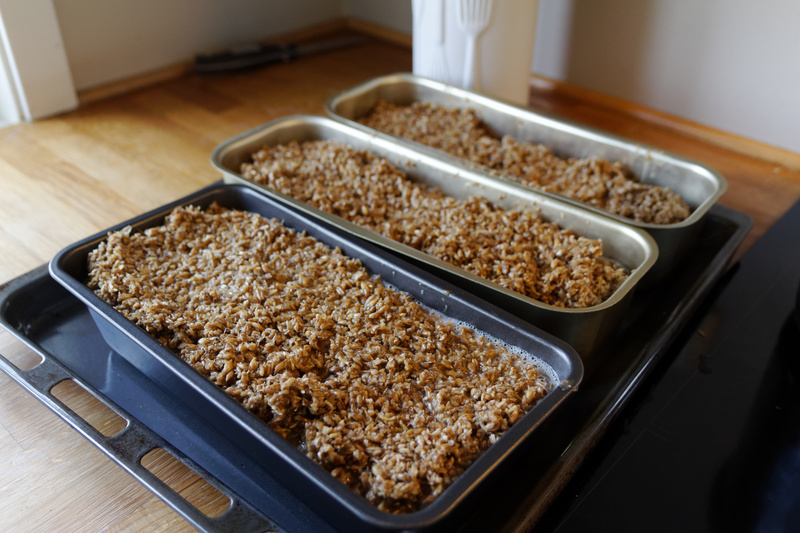
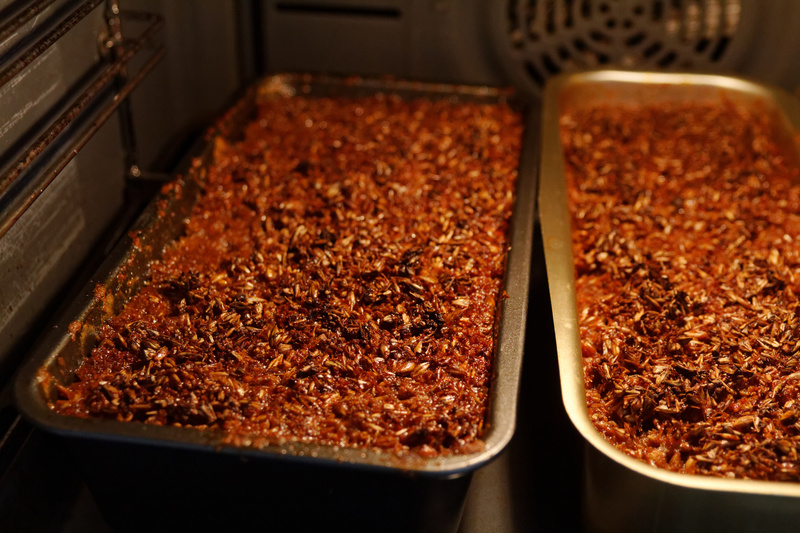
The mash ready in oven pans. |
Then the boxes went into the oven and I settled down to watch the show.
After 10 minutes the water in the boxes started boiling, so clearly the boxes had reached 100C already. I decided 250C for three hours might be a bit over the top and reduced the temperature to 180C.
25 minutes. The visible water was mostly gone, but bubbles kept popping up, so there was still boil going on.
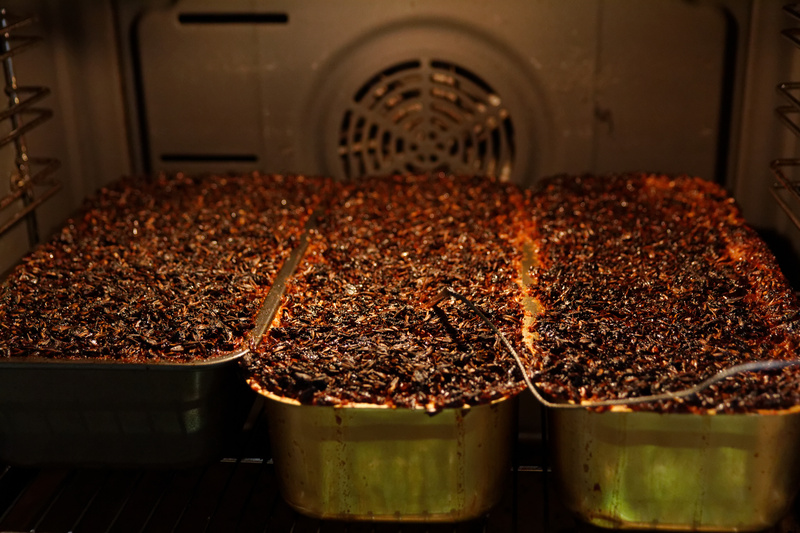
At 45 minutes it was still boiling, and the tops started going brown. A caramelly smell was coming out of the oven, so clearly I was on the right track.
65 minutes: the top was drying out and getting browner, but still boiling. Some smoke was beginning to appear.
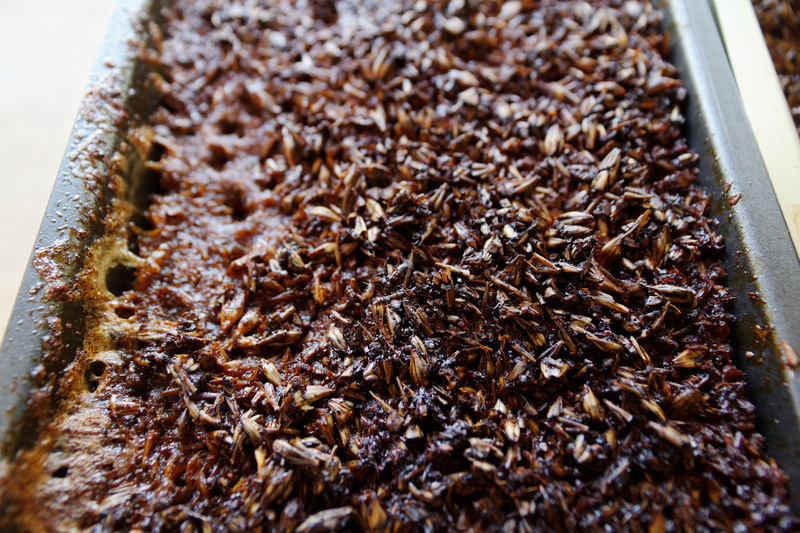
The first box dried out at 2 hours, with the other two still boiling. Colour had kept darkening the whole time.
Getting pretty dark and fairly dry. |
At 2.5 hours only one box was still boiling and now they were really getting dark.
After 3 hours the last one was still boiling when I took them out. I used my thermometer to check the center temperature and was astonished to get readings of 95-98C for all of them. 3 hours at 180C and they still haven't gone above 100C?!? What the ...
The mash after baking. |
Poking at the mash I found there was a hard crust on top, with soft gooey caramelly stuff right underneath (promising!). The dark layer was very thin and underneath the mass of the mash was roughly as pale as when I started.
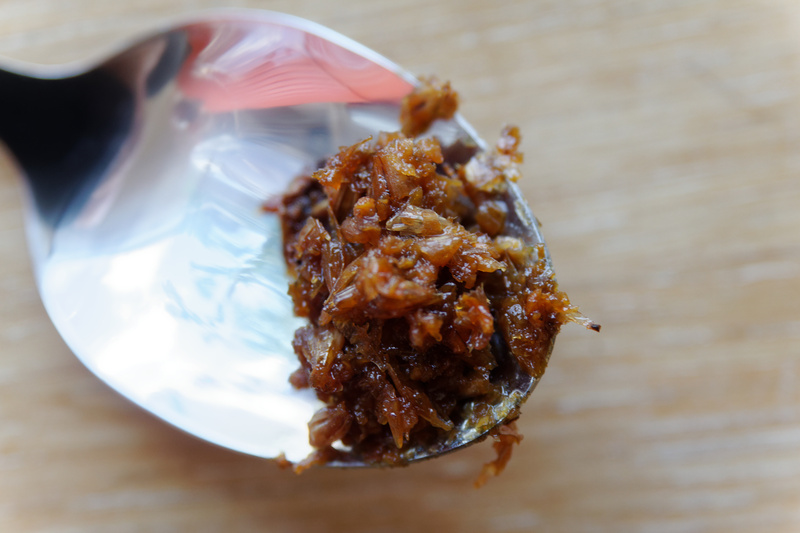
Soft, gooey, caramelly stuff. |
Anyway, I had work to do. I used a large wooden fork to break the crust on the boxes and dump the contents into the lauter tun. Then I added hop tea and hot water. Finally I ran off about 4 liters of wort. The idea was to get 5.6 liters, but my lauter tun is quite big, so I ended up losing 1-2 liters at the bottom that I couldn't get out. An unexpected downside of the small batch size.
The wort was at OG 1.072, and I pitched a dry flake of #20 Espe that I had taken from my freezer that morning. The wort was around 30C. I pitched at 1900, but by the time I went to bed there was still no activity, although foam started appearing during the night. It took roughly 24 hours for fermentation to really take off, so probably the viability of the yeast I'd taken out was not the best.
24 hours after that the beer was mostly fermented and I bottled it.
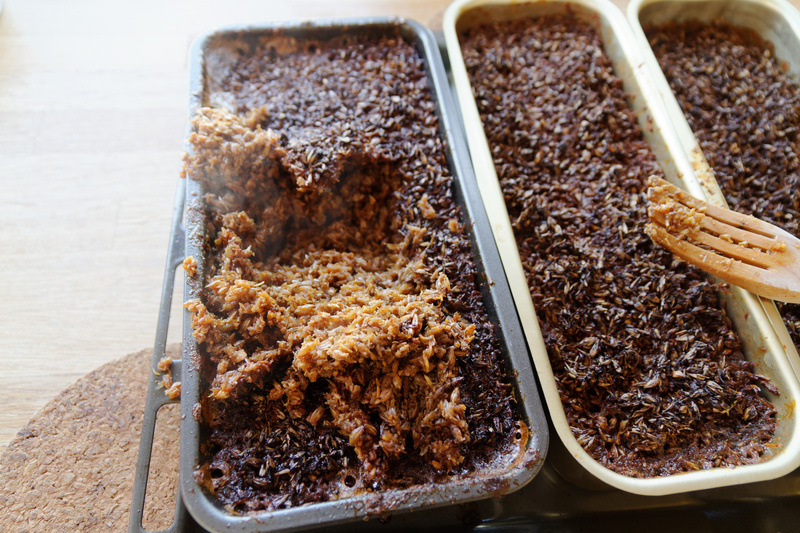
The mash opened up. |
I waited a few days, and then it was time for the big moment: the tasting. And my keptinis tasted like ... vossaøl!??! Instantly I knew what had happened. Since the temperature had never been above 100C I had basically done a 3-hour boil and got the same flavour that the brewers in Voss get from their long wort boils. It's caramelly, sure, but not with the same depth and intensity.
The reason I didn't get above 100C was so obvious I'm embarrassed I hadn't thought of it beforehand: liquid water under normal conditions never goes above 100C. If it does, it becomes steam and escapes. So as long as there was visible boiling there was still liquid water, which meant the temperature couldn't be above 100C.
How was that possible at 180C for 3 hours? Well, evaporation of water actually consumes a lot of energy. A water molecule evaporates when accidental collisions with other molecules give it high enough speed to escape the liquid, but all of that kinetic energy is then lost from the liquid. Other molecules banged into the one that escaped, giving their kinetic energy to the escaping molecule so that it's knocked loose, taking all that kinetic energy with it. The sum of the kinetic energy of all the molecules is the heat of the liquid.
I concluded that the reason this attempt didn't work out was that I had too much water, so that it took too long to evaporate it all, and that the temperature wasn't high enough. So I would just have to try again.
Second attempt
I decided this time I would mash in an insulated coolbox, which would keep the temperature better, so I wouldn't have to add so much water. And I would bake at 250C, because although that clearly was very hot, the previous attempt showed that the darkening was only on top, anyway.
And I realized I could use my wife's meat thermometer to constantly measure the center temperature, so that I could see what was going on all the time.
Thus prepared I tried again. This time I needed only about 2-3 liters of water to mash initially, despite having 3.3 kilos of malts (that's what was left). I ended up adding 4 liters in the end, but that still still better than last time, when I had 1.45 liters per kilo, since I now had 1.2 liters. Still, this was less of a difference than I'd hoped.
Mash in the oven, with meat thermometer. |
Anyway, after an hour I scooped the boxes full of mash, and put them in the oven, which had been pre-heated to 250C. Then I stuck in the meat thermometer and settled down on the floor in front of the oven.
It took 14 minutes before it started boiling at the edges, but at that point the center temperature was still only 59C. Interesting! So there was clearly quite a temperature gradient from the edge to the center.
After 30 minutes the center temperature was still only 70C, but the mash started turning brown on top, and it also swelled up, overflowing the boxes. I put a larger pan underneath to catch the spill, so there wouldn't be so much to clean up afterwards. I also made a note for later: don't fill the boxes completely — leave some room for this swelling.
After 36 minutes some burnt smell started coming off, despite the center temperature being only 75C.
After 45 minutes we were at 94C and the crust on top was going darker brown.
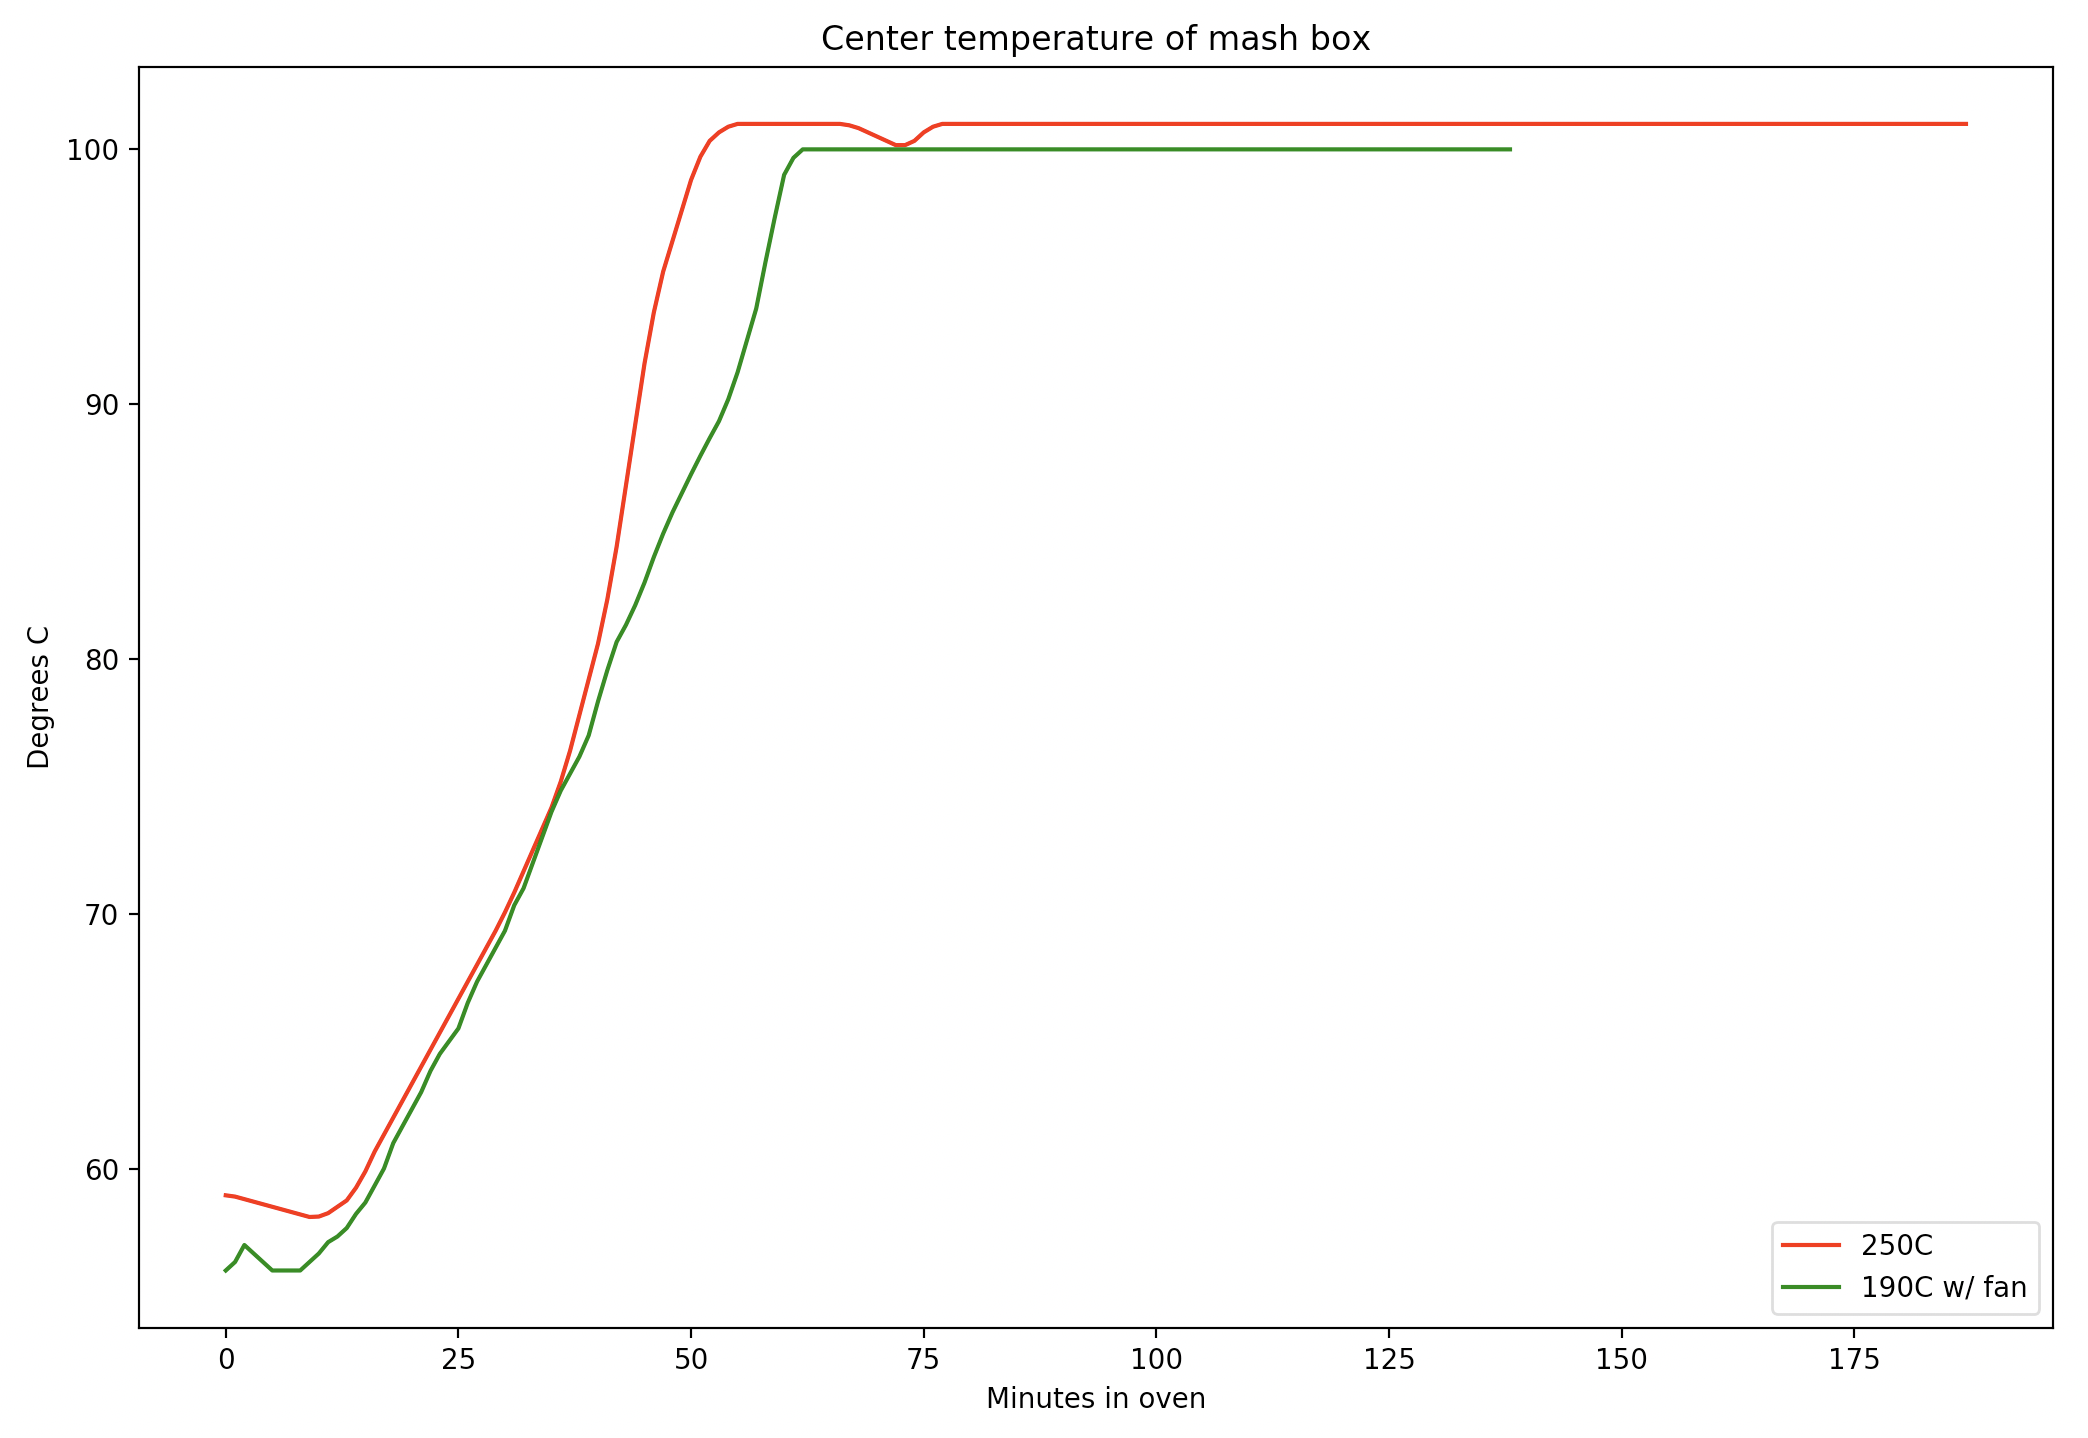
After 51 minutes the center temperature reached 100C. Now I needed to wait for the water to evaporate out so we could go above and get to the interesting caramelization temperatures.
Mash after 75 minutes. |
So there I sat on the floor in front of the oven, watching the thermometer, waiting. And waiting. And waiting. And waiting. Three hours after I put in the mash, the center temperature was still stuck at 100C. Or actually 101, according to the thermometer. (I don't know why.)
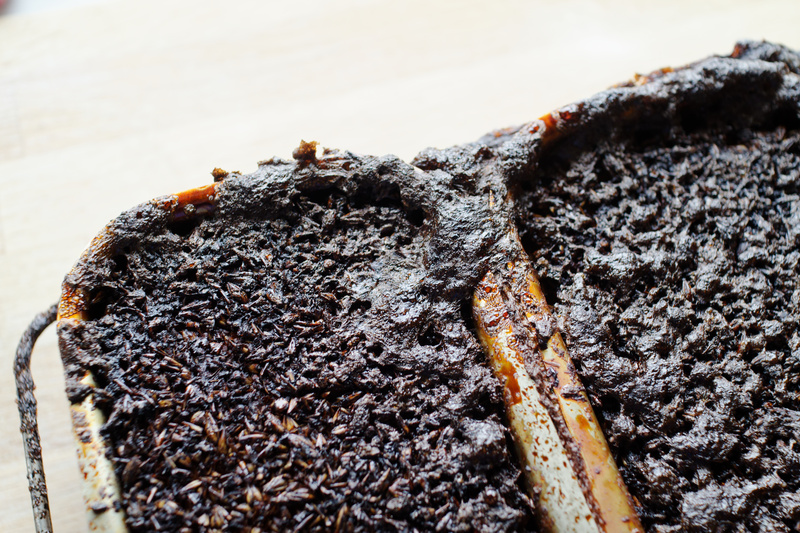
I took out the boxes, and this time the crust was black as soot. But still we hadn't gone above 100C! How on earth was I going to get this to work without burning the whole thing to cinders? The Lithuanians had gotten a beautiful brown caramelly crust. Why couldn't I?
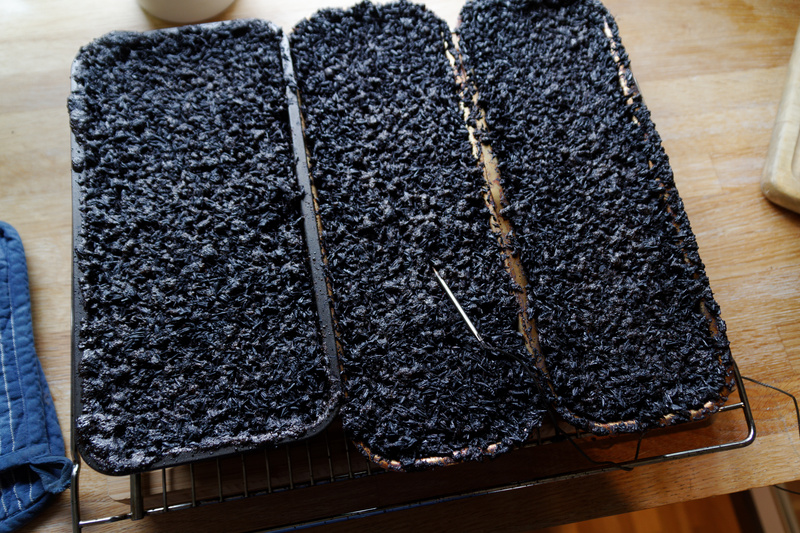
It's pretty black. |
Just like last time, the black crust on top turned out to be thin, with most of the mash much paler. Although it had definitely darkened a bit from where we started.
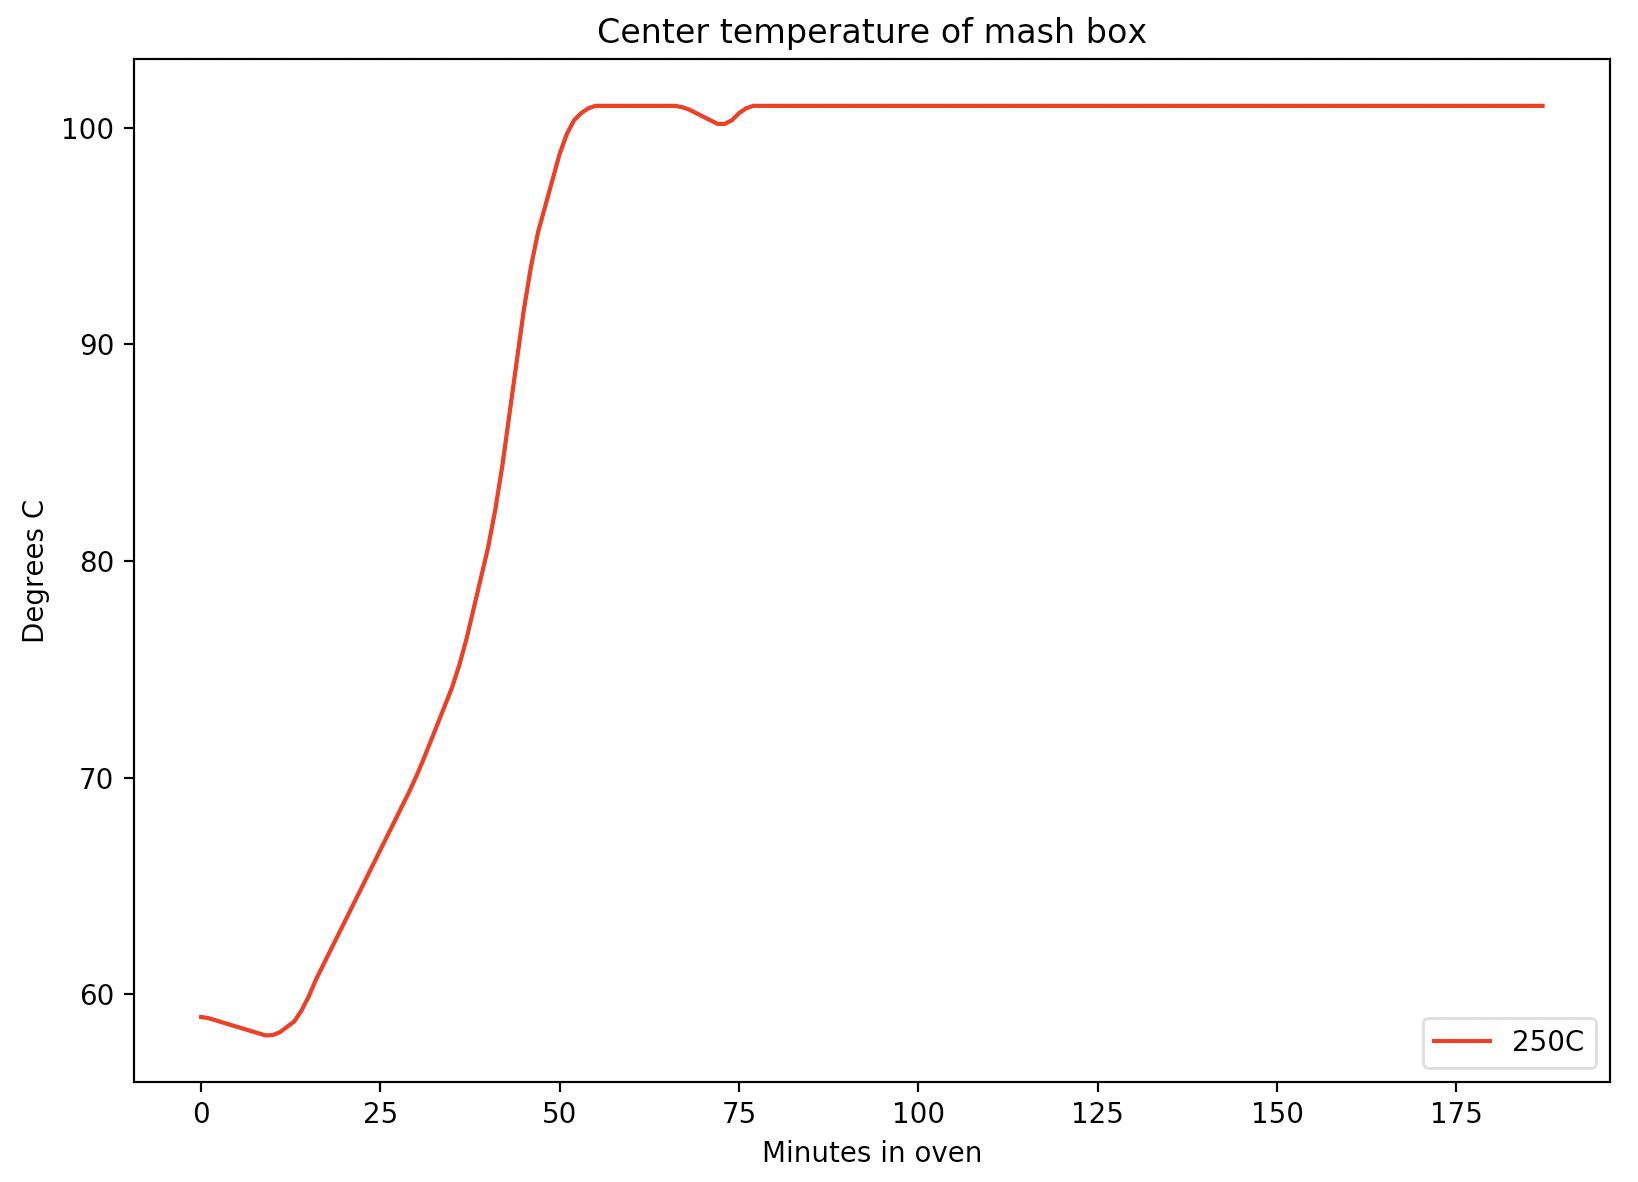
The graph below shows the temperature development.
Center temperature graph |
Again the temperature remained stuck at 100C the whole time.
One interesting thing to note is that the mash went through a kind of second mashing for about 45 minutes. So fermentability should be very good, but somewhat reduced again by the caramelization.
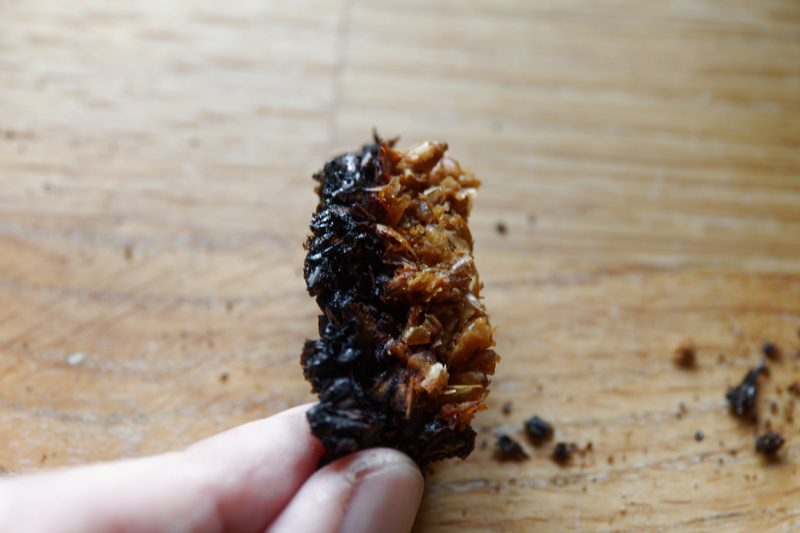
Black layer is not so thick, though. |
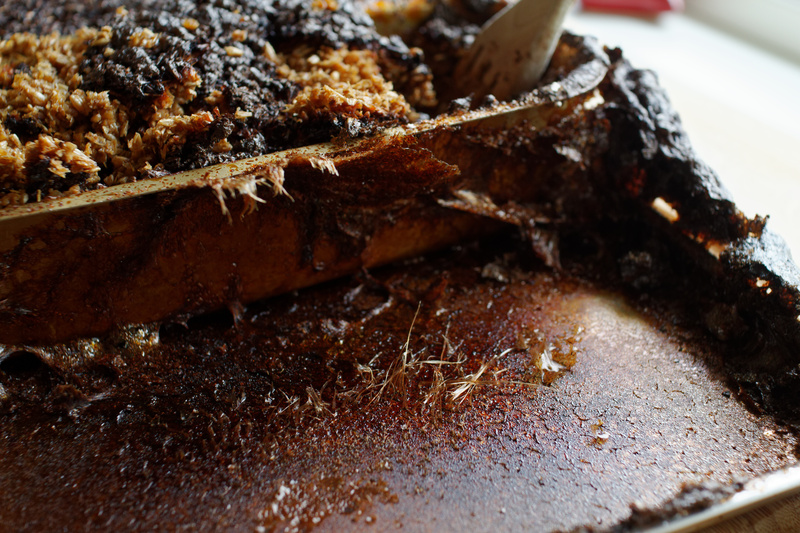
I did the hop tea, lautered the wort, and pitched the yeast, and started on the cleaning in between. That turned out to be a nightmare. The high temperatures had burned the sugars to a dark, hard substance that was very difficult to get off. The non-stick pans weren't too bad, but the older ones took hours to clean. One of them I was just barely able to clean at all, despite using so much brewer's cleaning agent that I scraped off some of the surface.
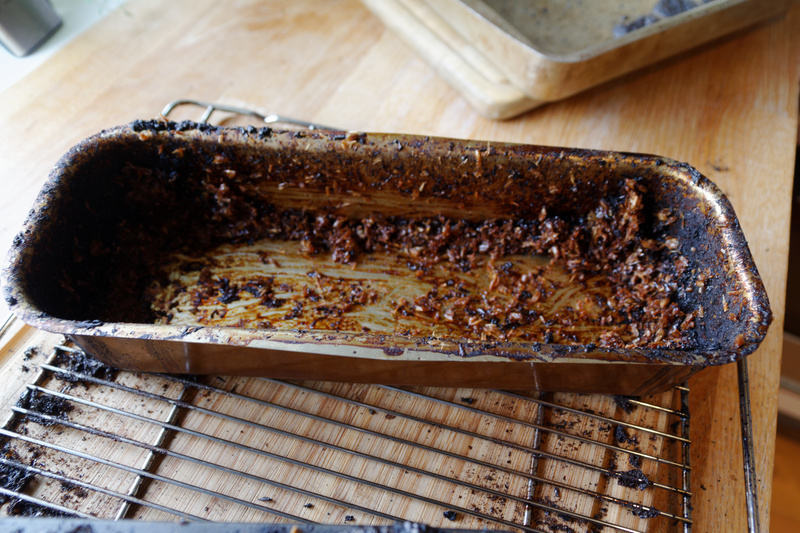
Black sticky mess. |
And then there was the pan I'd used to catch the overspill. Sugary wort had dripped down onto this metal heated to 250C where it had boiled furiously, eventually forming bone dry and rock hard shapes looking more like congealed lava than anything edible. This stuff was so hard I seem to have unintentionally invented a new building material. The process for producing it is perhaps not cost-effective, but you do get beer as a side-effect, so ...
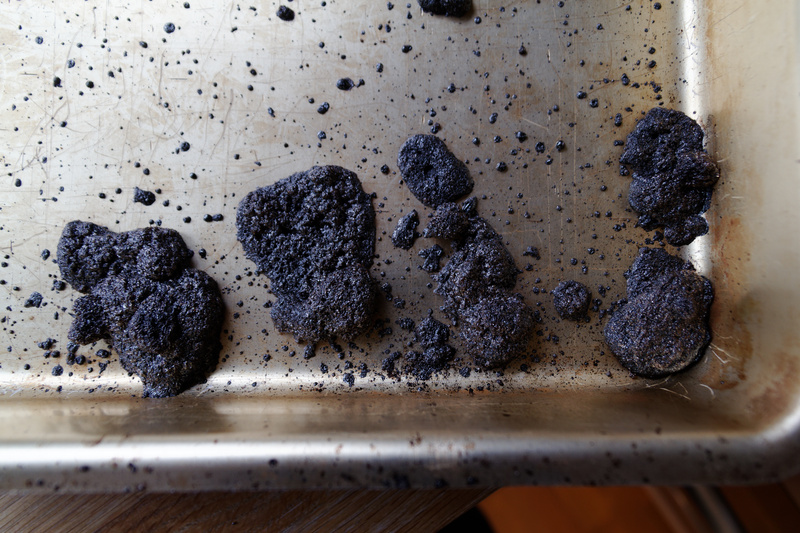
Sugar "art". |
I didn't even try to clean up this pan. I told my wife I'd buy a new one and just threw it away. (I want to record my gratitude for her being understanding about this.)
Eventually the beer was finished fermenting and I could taste it, gingerly. I was fully expecting to find that I had brewed undrinkable sooty water, but the beer was actually quite nice. It didn't really have the caramel flavour, but an odd, toasty, mineraly flavour. It wasn't what I'd tried to brew, but not bad at all. That was reassuring, because it helped convince me that brewing this type of beer isn't that difficult. It may be tricky to control the flavours precisely, but you do get something interesting and drinkable even if you overdo the baking.
Third attempt
After having gone too low and then too high without ever getting the center temperature above 100C, I had some thinking to do to figure out what was missing. In the end I decided the problem might be that the duonkepis oven has an outlet for the smoke and hot air through the chimney, while our oven is not that well ventilated by default. So perhaps a lower temperature with the fan turned on, in order to vent the humidity out?
I decided to try 190C with the fan on. This time mashing and all of that went pretty quickly, since I was getting used to the drill. Into the oven it went, and:
Center temperature graph for attempts two and three |
Still no luck getting above 100C. (And why did the thermometer show 100C this time, but 101C last time? No idea, really.)
The inside of the oven was clearly quite wet the whole time. My glasses fogged up when I opened the oven, there was visible condensation on the lamp inside the oven, and visible boiling went on for the first 1.5 hours. In fact, this time it boiled so furiously it spattered the door and walls in sugary liquid. I was glad I'd put some extra large pans underneath to catch any spill, because although the swelling mash did not flow over this time, the boil was so strong that some of the wort did.
Very dark brown mash with caramelized sugar on top. |
In fact, I seemed to be getting caramelization in this sugary, sticky layer on top of the mash. Once the top layer started turning really dark brown, I stopped, figuring it would be a bad idea to burn away any caramel I might have created.
Once I broke the crust I found that I also seemed to be getting caramelization along the edges of the boxes. The cleaning was also easier this time. The boxes were sticky and gooey, but this was the kind of sugars that easily give in to hot water, and not the basalt-like black stuff from the previous attempt. So this time it was looking promising.
Sticky sugary stuff |
And after fermentation I did indeed find that this attempt was my closest yet. There was a clear caramelly flavour, distinctly different from the caramel flavour of a vossaøl, although without the deep intensity of the original.
I'm beginning to suspect that another aspect of the traditional oven may be important: the brickwork, which stores the heat for a long time. The mash boxes are placed directly on the very hot bricks, and this may also contribute to the flavour. Anecdotal reports from other brewers indicate the same. So if you have a pizza oven that may be better suited for keptinis than an ordinary electric oven. And if you do have an electric oven, a pizza stone, quarry tile, or something similar to place the boxes on may also be a good idea.
However, one thing I definitely learned was that you get an interesting beer pretty much no matter what you do.
Fermenting keptinis |
For all of these beers I ended up with a pretty high final gravity, but this could be because the #20 Espe I was using was not really as vigorous as it should have been. I'm not sure. I reused the same yeast from batch to batch, in order to get experience with that as well, which means that whatever it was that made these fermentations so sluggish may simply have been a problem with the frozen yeast I started with. Or it may have been something about keptinis wort. I simply don't know.
Summing up
The actual recipe can be found at the bottom of the original blog post, but I think it's useful to summarize the main things I learned:
- If your partner has strong feelings about the oven pans, maybe start by discussing the project with her/him.
- The best temperature seems to be 190C with the fan on, until the top starts heading toward black.
- Use small pans: the reactions you're looking for happen around the edges.
- Try to keep the amount of water in the mash to a minimum.
- Use a pizza stone/quarry tile if you can.
- Leave room for the mash to swell.
- Put something underneath the pans to catch stuff that boils over.
- Stop once the top starts going really dark brown. (Although you don't have to. Some keptinis has traditionally been baked totally black.)
And, last but not least, don't worry too much about burning the mash. You get interesting flavours anyway.
Similar posts
How to brew keptinis
Keptinis is a little-known Lithuanian style of beer where the mash is baked in an oven
Read | 2018-07-11 15:44
Keptinis, Lithuanian baked beer
Farmhouse ale styles are known for being messy, sprawling, ill-defined categories to the point where it can be questioned whether they really are styles at all
Read | 2015-04-20 12:36
Comments
Yann - 2020-04-12 11:19:44
Fascinating experiment! I have been thinking of how to go about this in my oven. I am soon ordering 25 kg of pale malt for some trials.
One thing I would like to suggest: can you check e.g. with oil and another thermometer that the meat/oven thermometer goes beyond 100? My oven has a thermometer I can use to automatically switch off when the meat reaches the set temperature but it is not going above 99 (which is perfectly fine for any food done in the oven typically). Could it be that in attempt 2 or 3 with the drier mash you did boil off the water and go higher but the thermometer wouldn't show it?
Thanks for your outstanding research! Yann
Yann - 2020-04-12 11:24:21
Another idea: how about spreading the mash on oven trays? Well, maybe second hand ones dedicated to keptinis baking? Wouldn't that be a much better surface to volume ratio?
Yann
Nick - 2020-04-12 13:58:42
Lars, thank you for persevering with the keptinis. The “mess” can be completely eliminated + / - 100% with the use of baker’s “parchment paper” to line your bread pans and baking sheets. Works like magic. Nick
Nick - 2020-04-12 15:30:43
Lars- I wonder if keptinis mash might be handled more like bakers handle bread? Presently I make 4 loaves of bread with 1033 grams H2O and 1476 grams flour: 1033/1476 ===> .699 or 69.9% baker's percentage. (This is about half of the brewer's 123% mashing percentage.) Bread baked at 205C for one hour, 69% hydration with kviek for leveling, turns out a caramelized amber thin crispy crust and a completely baked crumb. Thanks to your trials, I'm going to try the 69% mash on my next keptinis and see what happens. At 123% normal mash hydration half the water must be in the barley and has to come out before the internal temperature can rise above 100C?? There are Scandinavian brown breads baked overnight in slow ovens even saunas I hear. What if a 69% keptinis mash went into the oven at 102C to get the water out and then finished in the morning at > or = to 140C for caramelization. Then, the water can be put back in during lautering? More fun! Nick
Bas - 2020-04-12 16:25:07
Nice experiment! There are other differences between your oven and the brickwork wood fired ones. For starters, a domestic home oven will get hot but not efficiently carry off the moisture as it boils off a large part will just be recirculated so more water will remain in there overall. I believe water is needed for caramelisation, so this might not be a bad thing. Secondly the heat transfer rate from a brickwork oven will be much larger, in your home over you're using air as a heat transfer agent instead of contact with the solid bricks. That's probably why the fan helps, it improves contact and heat transfer.
Gut feel is that the issue is that you are burning away too much of the grains at the surface while the stuff in the middle is still in the water boil stage, only when most water is boiled off will that caramel start to be formed, at least that's how it world when just making caramel from sugar in a pan.
Alternatives might be lowering the oven temp more, say to 160,and covering with aluminium foil, the lengthening the amount of time in the oven. Minimises the burning at the surface, while still allowing thorough heating throughout. Or you could try mixing the mash as it's being toasted to prevent burning of the outer surface while the internal water is still boiling off?
Richard Ten Hulzen - 2020-04-12 16:44:29
Lars, Fantastic blog. Also can’t wait to read your upcoming book, which I’ve pre-ordered. Regarding keptinis, I think you need to view the process like baking bread—the humidity level of the oven is important (https://bakerpedia.com/processes/relative-humidity/) To reduce the amount of burnt crust, I would consider using a Dutch oven (or disposable deep aluminum baking pans with lids) and take the lid off 30 minutes before completion to drive off excess moisture without carbonizing the top surface as much. I would also consider using just one deep vessel (like you see in the first photo) to minimize total top surface area (less % of mash gets burnt). I also would suggest not trying to completely drive off all fluid, otherwise you’ll spend days trying to remove the carbonized material. Agree with allowing “head space” for liquid and gas expansion during the process in order to minimize messes. One more observation is to take out the mash ( just like bread and cookies) earlier than you might think necessary—it continues to darken as it cools down to room temp. Cheers! Richard
Tim Douglas - 2020-04-12 18:08:06
Awesome stuff! Love to see more experimentation here.
Dundulis has a Facebook post with some details on how they brew keptinis: https://www.facebook.com/dundulis.alus.gira/posts/2253263574769095 I used this as a reference along with your older blog post when I attempted to brew one.
As far as temperature goes, they seem to use 280C for 30 minutes, then reduce to 200C for 2.5 hours. When mashing, they also leave 15% of the malt dry as a "lid" on top of the mash, helping to insulate it and dry it out before going in the oven.
Jeff Alworth - 2020-04-12 18:50:59
I think you sort of buried the lede here. After all that, how did the different batches *taste*? I’m curious how much caramel vs burnt flavor you got, and especially curious what the last batch tasted like compared to farmhouse examples.
Lars Marius Garshol - 2020-04-12 19:22:40
@Yann: That's an interesting idea. That's not impossible, no. I need to check. Thanks for the tip! (It did show 101C, so probably not, but worth checking.)
And, yeah, I'm thinking seriously about trying oven trays. It's cheating, because it's so different from what the Lithuanians do, but I feel I've kind of used up what a normal electric oven can do, anyway, so why not. Might be some volume issues, but worth a try.
@Nick: Thank you for that idea! Next time.
I don't think you can reach 65C with so little water. Unfortunately. But reducing the water content is definitely the right idea.
@Bas: You do need water for caramelization, but you can't have very much of it. But I agree with your reasoning.
The trouble with 160C is that you get very little caramelization at that temperature. Unfortunately. It could work, but it's not what I'm going to try first.
@Richard: But with lids you get no evaporation, right? So I don't understand how that's going to work.
The problem with one deep vessel is that the caramelization happens at the edges. So you need a lot of surface or it just won't work. I've seen from other examples that big vessels give less flavour.
After three experiments I know for sure that at 180C and 190C the cleaning is not an issue. That was at 250C.
@Tim: I think their idea of high initial temperature and then lower seems promising. So that's something else I might try.
@Jeff: Guilty as charged. The problem is I can only find taste notes for number 2. So I had to do everything about the taste from memory, unfortunately.
Richard Marzec - 2020-04-13 21:19:33
I think your attempt #1 was correct. It should not be burnt. You have more then enough caramelization going on to produce a delicious beer.
Lars Marius Garshol - 2020-04-14 06:43:05
@Richard: As explained in the blog post I did get caramel flavour, but the wrong kind. It tasted like a beer with a four-hour boil, and not like keptinis.
William Taylor - 2020-04-21 15:43:05
Hello Lars, I made Keptinis from your original blog. I sized the batch to 5US GAllons. I ordered Viking grains and some Omega yeast. For the baking I started at 75F and let the oven heat to 500F, took about 20 min. Then I baked for 1 hour at 500F, reduced the temp to 400F and after an hour reduced to 300F. After another hour I removed my pans. The top of the mash was slightly black around the edges and a hard crust had formed. The center of the mas was a wonderful sticky dark brown similar to molasses.
Waiting to see how the brew turns out in the next couple of days.
Thanks for the great information.
Regards
Cameron - 2020-05-01 21:16:23
This is a fascinating process and one I'll try soon. Your writing inspired me to convert my rye sourdough starter into a beer starter. My experiments have been promising so far. Apricot and creamy aroma with mild phenol, ferments quite dry and tart with a distinct dry apple cider character. Im going to try making a hopped beer to suppress the lacto bacillus and see what happens.
I think the primary browning reaction in the center of the pans is the maillard reaction not caramelization. Maillard reactions happen at much lower temperatures such as in long boiled worts. There will certainly be caramelization at the surface where the grain dries out and maybe at the edges of the pans where radiant heat hits them. The brick oven in Lithuania would have much more intense radiant heat than your home oven.
Some speculation:
Do you know if your water was similar to that used on the farm? Maillard reactions go much faster in less acidic conditions. If they have water with high alkalinity, they may be able to brown things much more effectively than someone with soft water would.
Having the highest sugar mash possible will also help as it will elevate the boiling temperature to some degree.
Protein content of the malt may also be playing a role with more protein causing more maillard browning.
Lars Marius Garshol - 2020-05-04 11:55:34
@Cameron: I agree it does appear that the boxes are seeing a mix of maillard and true caramelization. How much of each is difficult to say.
What's interesting is that their pH was actually surprisingly high: the mash was 6.1 after mashing. After baking it was 5.6. So you do seem to have a very good point there. That is very interesting.
The malt they used when I was there was normal commercial pale malt, so nothing special there.
Rob - 2020-05-09 21:18:11
I wonder how it would turn out microwaved in a glass or ceramic bowl. People are caramelizing sugar in the microwave!
Schultz - 2020-05-29 21:44:34
The water is what is keeping the temp low. Actually it is a vombination of water and the heat capasity of your oven. An electric oven does not have much heat capasity. You can add stones like a sauna to force the steam out.
Damian - 2020-06-25 09:30:28
Hi, as always great post, very pleasant to read. I'm going to make keptinis at home but I'm thinking about some twist in grain bill. What do you think about using munich malt instead pale malt. Do you think bready, malty profile of this malt can went well with carmelizarion in oven? Maybe you already did that experiment or you heard about someone who did that? Thanks for help, and keep going great job with blog and your researches!
Ben Martin - 2020-06-29 19:45:45
Thanks for this Lars. Did you manage to take any gravity readings or rough ABV for these beers? I know that info was missing from your book, so was just curious.
Lars Marius Garshol - 2020-07-05 16:52:38
@Damian: I haven't tried it. It could work, or you might end up with too much caramel. Hard to say.
@Ben: I fell sick with some stomach issue during the course of the keptinis brewday, so I never got to take those readings. I was planning to go back to do it this May, but then covid-19 happened. Eventually I'll get the information, but right now I don't have it.
Adam Lorentzen - 2020-08-09 19:14:44
Hey Lars, I tried the keptinis recipe you published using pale malts, scaled down to a 5 gallon batch. I ended up baking the mash in a pizza oven at 700F for 1 hour. My mash never got as dark as yours, though the top was fairly black. It’s just so cloudy with visual particles swirling around, it doesn’t look anything like the samples you posted. Any advice?
Lars Marius Garshol - 2020-08-10 13:49:10
@Adam: I don't know why it would be so cloudy, unless you used wheat or oats. Maybe poor filtering during lautering? Racking to secondary fermentation after primary may help. None of my keptinises have been cloudy, so I have no special advice, I'm afraid.
Kilian Cuerda - 2020-10-18 21:06:05
Hello Lars, do you think it could be possible to try to do this kind of process with home made malts (wheat, rye), not dried? I'm thinking in something like the brewer of the korchaga in Russia did, but with the open pans in the oven as in keptinis (I have at home clay oven pans, tipical from the valencian cuisine, Spain). A kind of mix between the two techniques. Thank you very much for your time and attention.
Lars Marius Garshol - 2020-10-19 06:49:28
@Kilian: There's no obvious reason why you couldn't do a keptinis with undried malt. I don't really know that you'd get anything special out of not drying the malt, but it should work and produce a beer. And you should get the caramel flavour.
Kilian - 2020-10-19 13:49:02
Thank you! The reason isn't nothing special... It's because not always i have the necessary to dry the malts well.
PhillC - 2020-11-02 20:50:30
@Killian I'm really interested in your home malting experiments. Any further details about how you went about it and what the beer was like would be great. I tried the same thing with 100% rye, but it didn't quite work out as expected.
I posted about the process here: https://www.thehomebrewforum.co.uk/threads/experiments-in-home-malting.87088/
I have another 5kg of rye grain and I'm thinking of trying again, but I need to know if my technique is completely out of whack.
Jared - 2021-03-23 11:01:37
I'm a gluten-free brewer and did a couple of similar brews in 2017/18 because I thought it should work and might solve some of the normal problems of gluten free mashing. My first all-grain brew was done this way. Was exciting to learn that my approach was actually a real technique. You can skip lautering and just throw the baked malt bread into water if efficiency is less of a concern than ease of process.
This inspires me to try again though.
KilianG - 2021-04-03 06:24:21
I have an offset smoker and a wood fired bread oven, in a pizza oven the fire remains there the whole time, in the bread one I have, you pre heat it with fire, then take everything out and then you put the bread or whatever, sounds similar to the keptinis ovens, I haven't used it in years so I'll be starting with the offset smoker as I'm more used to control the temperature there, placing the coals in the fire box and the keptinis in the smoke box
Menahem - 2021-08-28 23:13:49
Hello Lars, Great post ! thanks for sharing.
My uneducated hypothesis on the reason you never get above 100/101 C degrees inside the mash, is because the middle does not dry out.
As long as its soaked in water, it can only reach about 100 (depend on the water's composition), once the water is over that, it becomes gas, but the liquid part can't go over that temp (unless your oven is under pressure of course).
It's like when you boil soup/beer whatever, the temp of liquid will not go over ~100.
*Not a chemist. more like pub science.
Jeff - 2021-10-24 06:05:09
Hi Lars, I'm thinknig about trying this with my gas BBQ, its a 4 burner BBQ with a lid and im thinknig of putting the mash into disposable aluminum trays directly onto the hotplat and or grill of the BBQ with the burners on full. My question is do know anything about using aluminum? I'm worried it could get into my beer somehow, i know some people warn about using aluminum pots with cooking. Do they use aluminum or stay away from it?
Lars Marius - 2021-10-29 09:22:08
@Jeff: I'm sorry, but I don't really know much about using aluminum for this. I know acidic foods are worse, and your mash might be something like 4.5 pH, but how bad that really is I don't know. Probably if you just do it once it won't actually be bad enough to harm you, as opposed to cooking with aluminum gear every day.
Robert - 2022-04-13 21:21:30
I appreciate your blogs I have built a large brick baking oven from the site of traditional oven by Rado Hand and I have made some good meals. The idea of using the oven for making beer great. My mind is going through different ways to use items for one purpose to substitute I have stainless steel cream separator with large bowl maybe tun? There are aluminum kegs for storing beer doesn’t change flavor aluminum cans although poring in glass or ceramic mug is better. Aluminum kegs modified for tun
Robert - 2022-05-26 06:04:58
I appreciate your blogs I have built a large brick baking oven from the site of traditional oven by Rado Hand and I have made some good meals. The idea of using the oven for making beer great. My mind is going through different ways to use items for one purpose to substitute I have stainless steel cream separator with large bowl maybe tun? There are aluminum kegs for storing beer doesn’t change flavor aluminum cans although poring in glass or ceramic mug is better. Aluminum kegs modified for tun